Kafka and NestJS: Building a Custom Library for Message Consumption
A real-world look at building a custom Kafka consumer library with NestJS, keeping the NestJS developer experience while taking control over Kafka message consumption, batch processing, and production constraints.
In this article, I share a real-world experience around integrating Kafka with NestJS in a Node.js and TypeScript microservices architecture.
The goal was simple: keep the developer experience of NestJS while going beyond some limitations of the native Kafka transport, especially for higher-scale message consumption needs.
Context
As part of a project for a major retail company, we were working on a microservices architecture built with Node.js and TypeScript.
The goal was to build services that were lightweight, fast to deploy, easy to maintain, and able to communicate through Kafka.
NestJS quickly became a good fit because of its module system, decorators, and dependency injection.
But the native Kafka integration provided by NestJS did not fully cover our needs.
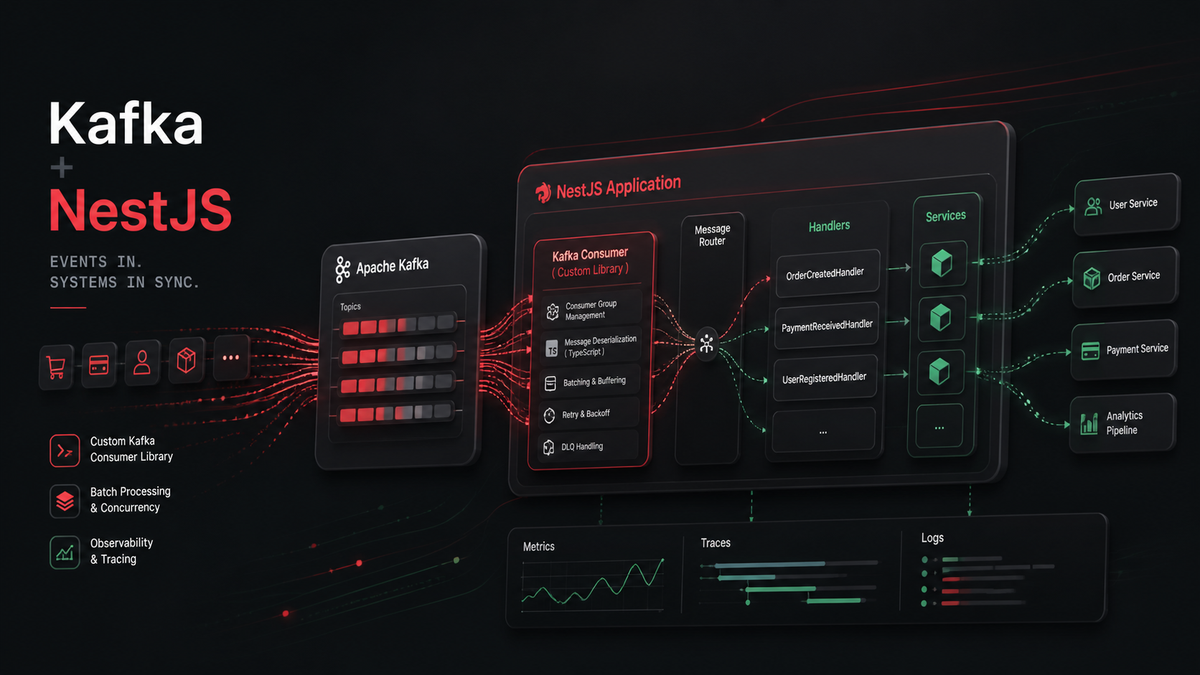
We wanted to create a small Kafka abstraction that would make it easy to consume messages using decorators, while keeping control over the actual Kafka consumption strategy.
Kafka with Node.js: what are the options?
To consume and produce Kafka messages in JavaScript, several libraries are available.
Some of the most common options are:
- KafkaJS — a pure JavaScript client, simple to use and popular in Node.js projects.
- node-rdkafka — a Node.js wrapper around librdkafka, historically used for higher-performance use cases.
- @confluentinc/kafka-javascript — the official Confluent JavaScript client, now the recommended default for new production projects.
At the time this work was originally done, the official Confluent JavaScript client was still in its early stages and was not yet the obvious production default.
Back then, choosing KafkaJS was pragmatic.
It was simple to install, easy to integrate in a Node.js environment, and already familiar to many teams.
Today, I would make a different choice.
For a new production project, I would now recommend starting with @confluentinc/kafka-javascript, the official Confluent JavaScript client, instead of KafkaJS.
KafkaJS can still make sense for existing projects or simple use cases, but for long-term production systems, I would now use the official Confluent client as the default foundation.
The examples below reflect the original implementation pattern, which was based on a KafkaJS-like API.
The limitations of the native NestJS Kafka transport
NestJS provides Kafka integration through @nestjs/microservices.
This integration works well for simple use cases:
- consuming messages with decorators
- producing messages through a Kafka client
- using Kafka as a transport between microservices
But in more advanced scenarios, some limitations start to appear.
The main limitation is related to message processing.
By default, NestJS relies on message-by-message processing. For higher performance needs, we wanted to leverage batch processing.
The goal was therefore to keep the NestJS developer experience, especially decorators such as @EventPattern, while taking back control over how Kafka messages are consumed.
Step 1: Starting the application and connecting Kafka
When the application starts, we need to tell NestJS to connect a Kafka server.
Instead of using the default Kafka transport directly, we inject our own custom transport strategy.
import { NestFactory } from '@nestjs/core';
import {
  CustomTransportStrategy,
  MicroserviceOptions,
} from '@nestjs/microservices';
import {
  FastifyAdapter,
  NestFastifyApplication,
} from '@nestjs/platform-fastify';

import { KAFKA_SERVER } from '@my-libs/kafka';
import { AppModule } from './app.module';

async function bootstrap(): Promise<void> {
  const app = await NestFactory.create<NestFastifyApplication>(
    AppModule,
    new FastifyAdapter(),
    { bufferLogs: true },
  );

  const strategy = app.get<CustomTransportStrategy>(KAFKA_SERVER);

  app.enableShutdownHooks();

  app.connectMicroservice<MicroserviceOptions>({
    strategy,
  });

  await app.startAllMicroservices();
  await app.listen(8081, '0.0.0.0');
}

bootstrap();
In this example, the NestJS application is created with Fastify and connected to a custom Kafka server provided by our internal library.
This allows the application to start consuming Kafka messages as soon as the microservice is started.
Step 2: Global Kafka configuration with forRoot
NestJS dynamic modules are a great fit for building reusable internal libraries.
The forRoot method is used to configure Kafka globally at the application level.
import { Module } from '@nestjs/common';
import { KafkaModule } from '@my-libs/kafka';

@Module({
  imports: [
    KafkaModule.forRoot({
      config: {
        brokers: ['localhost:9092'],
        sasl: {
          mechanism: 'plain',
          username: 'USERNAME',
          password: 'PASSWORD',
        },
        clientId: 'CLIENT-ID',
      },
      schemaRegistry: {
        config: {
          host: 'http://localhost:8081',
          auth: {
            username: 'USERNAME',
            password: 'PASSWORD',
          },
        },
      },
    }),
  ],
})
export class AppModule {}
This central configuration defines the Kafka brokers, authentication details, client ID, and Schema Registry configuration.
It gives the application one shared Kafka configuration that can then be reused by feature modules.
Step 3: Local topic configuration with forFeature
The forFeature method allows each module to declare the Kafka topics it needs.
import { Module } from '@nestjs/common';

import {
  DeserializerEnum,
  KafkaModule,
  TopicType,
} from '@my-libs/kafka';

@Module({
  imports: [
    KafkaModule.forFeature([
      {
        name: 'MY-INPUT-TOPIC',
        type: TopicType.INPUT,
        topic: {
          consumer: {
            groupId: 'MY-GROUP-ID',
          },
          deserializers: {
            keyDeserializer: DeserializerEnum.STRING,
            valueDeserializer: DeserializerEnum.AVRO,
          },
        },
      },
    ]),
  ],
})
export class MyFeatureModule {}
This keeps the configuration clean:
- forRoot for global Kafka configuration
- forFeature for module-specific topic configuration
Each module can declare its own topics, consumer group, and deserialization strategy.
Step 4: Consuming Kafka messages in a controller
On the application side, the goal was to keep the NestJS developer experience.
A controller can still use decorators to declare which topic it listens to.
import { Controller } from '@nestjs/common';
import {
  Ctx,
  EventPattern,
  KafkaContext,
  Payload,
} from '@nestjs/microservices';

import { ConsumeMessage } from '@my-libs/kafka';
import { Key, Value } from './__generated__/kafka/message-key';

@Controller()
export class MyAppController {
  @EventPattern('MY-INPUT-TOPIC')
  async execute(
    @Payload() message: ConsumeMessage<Key, Value>,
    @Ctx() context: KafkaContext,
  ): Promise<void> {
    console.log(message, context);
  }
}
The handler receives both the deserialized Kafka message and the Kafka context.
This hides most of the Kafka complexity behind a simple NestJS API.
Step 5: Implementing the dynamic Kafka module
The KafkaModule is the entry point of the library.
It exposes two methods:
- forRoot
- forFeature
import { DynamicModule, Module } from '@nestjs/common';

import { KafkaCoreModule } from './kafka-core.module';
import {
  KafkaModuleOptions,
  TopicDefinition,
} from './kafka-options.types';
import { createKafkaProviders } from './kafka.providers';

@Module({})
export class KafkaModule {
  static forRoot(options: KafkaModuleOptions): DynamicModule {
    return {
      module: KafkaModule,
      imports: [KafkaCoreModule.forRoot(options)],
    };
  }

  static forFeature(topicDefinitions: TopicDefinition[]): DynamicModule {
    const providers = createKafkaProviders(topicDefinitions);

    return {
      module: KafkaModule,
      providers,
      exports: providers,
    };
  }
}
The forRoot method delegates global configuration to KafkaCoreModule.
The forFeature method creates topic-specific providers for the current module.
Step 6: Implementing the core Kafka module
The KafkaCoreModule stores the global Kafka configuration and creates a temporary Kafka server.
This server is later completed by the forFeature configuration.
import { DynamicModule, Module } from '@nestjs/common';

import { KafkaServer } from './kafka-server';
import {
  CORE_MODULE_OPTIONS,
  KAFKA_SERVER_TEMP,
} from './kafka.constants';
import { KafkaModuleOptions } from './kafka-options.types';

@Module({})
export class KafkaCoreModule {
  static forRoot(options: KafkaModuleOptions = {}): DynamicModule {
    const kafkaModuleOptionsProvider = {
      provide: CORE_MODULE_OPTIONS,
      useValue: options,
    };

    const kafkaServerProvider = {
      provide: KAFKA_SERVER_TEMP,
      useFactory: async (): Promise<KafkaServer | null> => {
        if (!options.server) {
          return null;
        }

        return new KafkaServer({
          kafka: options.config,
          consumer: options.server.consumer,
          run: options.server.run,
          subscribe: options.server.subscribe,
        });
      },
      inject: [],
    };

    return {
      module: KafkaCoreModule,
      providers: [kafkaModuleOptionsProvider, kafkaServerProvider],
      exports: [CORE_MODULE_OPTIONS, kafkaServerProvider],
    };
  }
}
This core module exposes two important providers:
- CORE_MODULE_OPTIONS stores the global Kafka configuration.
- KAFKA_SERVER_TEMP stores the temporary Kafka server instance.
The final Kafka server configuration is completed later with topic-specific options.
Step 7: Creating Kafka providers
The createKafkaProviders function is used by forFeature.
It reads the topic definitions, injects the global configuration, and configures the Kafka server with the correct consumer and deserializers.
import { Provider } from '@nestjs/common';

import {
  CORE_MODULE_OPTIONS,
  KAFKA_SERVER,
  KAFKA_SERVER_TEMP,
} from './kafka.constants';
import {
  DeserializerEnum,
  InputTopic,
  KafkaModuleOptions,
  TopicDefinition,
  TopicType,
} from './kafka-options.types';
import { KafkaServer } from './kafka-server';
import {
  KafkaAvroDeserializer,
  KafkaStringDeserializer,
} from './serializers';

export function createKafkaProviders(
  topicDefinitions: TopicDefinition[] = [],
): Provider[] {
  const inputTopics = topicDefinitions.filter(
    topic => topic.type === TopicType.INPUT,
  );

  return [
    {
      provide: KAFKA_SERVER,
      useFactory: async (
        moduleOptions: KafkaModuleOptions,
        kafkaServer: KafkaServer,
      ): Promise<KafkaServer> => {
        for (const topicDefinition of inputTopics) {
          const topic = topicDefinition as InputTopic;

          const schemaRegistryConfig =
            moduleOptions.schemaRegistry?.config;

          kafkaServer.setConsumerConfig({
            postfixId: topic.postfixId,
            consumer: topic.topic.consumer,
            run: topic.topic.run,
            subscribe: topic.topic.subscribe,
          });

          kafkaServer.setDeserializers({
            keyDeserializer:
              topic.topic.deserializers?.keyDeserializer ===
              DeserializerEnum.AVRO
                ? new KafkaAvroDeserializer(schemaRegistryConfig)
                : new KafkaStringDeserializer(),

            valueDeserializer:
              topic.topic.deserializers?.valueDeserializer ===
              DeserializerEnum.AVRO
                ? new KafkaAvroDeserializer(schemaRegistryConfig)
                : new KafkaStringDeserializer(),
          });
        }

        return kafkaServer;
      },
      inject: [CORE_MODULE_OPTIONS, KAFKA_SERVER_TEMP],
    },
  ];
}
This provider is where the global configuration and feature-specific configuration are merged.
Each module can declare its topics, while the Kafka server remains centralized.
Step 8: Implementing the custom Kafka server
The core of the library is the custom Kafka server.
It extends NestJS Server and implements CustomTransportStrategy.
This allows NestJS to associate @EventPattern handlers with Kafka topics while letting us control how messages are consumed.
import {
  CustomTransportStrategy,
  KafkaContext,
  Server,
  Transport,
} from '@nestjs/microservices';
import { isObservable, lastValueFrom } from 'rxjs';
import {
  Consumer,
  ConsumerConfig,
  ConsumerRunConfig,
  ConsumerSubscribeConfig,
  EachBatchPayload,
  Kafka,
  KafkaConfig,
} from 'kafkajs';

import {
  ConsumerOptions,
  Deserializers,
  KafkaServerConfig,
} from './kafka-options.types';
import { Deserializer } from './serializers';

export class KafkaServer extends Server implements CustomTransportStrategy {
  public readonly transportId = Transport.KAFKA;

  private readonly kafkaConfig: KafkaConfig;

  private consumerConfig?: ConsumerConfig;
  private consumerRunConfig?: ConsumerRunConfig;
  private consumerSubscribeConfig?: ConsumerSubscribeConfig;

  private client: Kafka | null = null;
  private consumer: Consumer | null = null;

  private keyDeserializer?: Deserializer<Buffer, unknown>;
  private valueDeserializer?: Deserializer<Buffer, unknown>;

  constructor(config: KafkaServerConfig) {
    super();

    this.kafkaConfig = {
      ...config.kafka,
      brokers: config.kafka?.brokers ?? ['localhost:9092'],
      clientId: `${config.kafka?.clientId ?? 'nestjs-consumer'}-${
        config.postfixId ?? 'server'
      }`,
    };
  }

  setConsumerConfig(options: ConsumerOptions): void {
    const { consumer } = options;

    this.consumerConfig = {
      ...consumer,
      groupId: `${consumer?.groupId ?? 'nestjs-group'}-server`,
    };

    this.consumerRunConfig = {
      ...options.run,
      eachBatch: this.handleBatch.bind(this),
    };

    this.consumerSubscribeConfig = options.subscribe;
  }

  setDeserializers(deserializers: Deserializers): void {
    this.keyDeserializer = deserializers.keyDeserializer;
    this.valueDeserializer = deserializers.valueDeserializer;
  }

  async listen(
    callback: (error?: unknown, ...optionalParams: unknown[]) => void,
  ): Promise<void> {
    try {
      if (!this.consumerConfig) {
        throw new Error('Consumer configuration is not provided');
      }

      this.client = new Kafka(this.kafkaConfig);
      this.consumer = this.client.consumer(this.consumerConfig);

      await this.consumer.connect();

      await this.consumer.subscribe({
        ...this.consumerSubscribeConfig,
        topics: [...this.messageHandlers.keys()],
      });

      await this.consumer.run(this.consumerRunConfig);

      callback();
    } catch (error) {
      this.logger.error(error);
      callback(error);
    }
  }

  async close(): Promise<void> {
    if (this.consumer) {
      await this.consumer.disconnect();
      this.consumer = null;
    }

    this.client = null;
  }

  private async handleBatch(payload: EachBatchPayload): Promise<void> {
    if (!this.consumer || !this.keyDeserializer || !this.valueDeserializer) {
      throw new Error('Required Kafka components are not configured');
    }

    const { batch, isRunning, isStale, heartbeat } = payload;

    const handler = this.messageHandlers.get(batch.topic);

    if (!handler) {
      throw new Error(`Handler not found for topic "${batch.topic}"`);
    }

    for (const message of batch.messages) {
      if (!isRunning() || isStale()) {
        throw new Error('Consumer stopped or batch is stale');
      }

      const context = new KafkaContext([
        message,
        batch.partition,
        batch.topic,
        this.consumer,
        heartbeat,
      ]);

      const deserializedMessage = {
        key: await this.keyDeserializer.deserialize(message.key),
        value: await this.valueDeserializer.deserialize(message.value),
        timestamp: message.timestamp,
        attributes: message.attributes,
        offset: message.offset,
        headers: message.headers,
        size: message.size,
      };

      const resultOrStream = await handler(deserializedMessage, context);

      if (isObservable(resultOrStream)) {
        await lastValueFrom(resultOrStream);
      }
    }
  }
}
The important part here is the use of eachBatch.
Instead of letting NestJS process messages one by one with the default Kafka transport, we take control of the batch processing strategy.
For each message in the batch, the server:
- checks that the consumer is still running
- builds a Kafka context
- deserializes the key and value
- calls the NestJS handler associated with the topic
- waits for async or observable-based results
This keeps the NestJS programming model while improving control over Kafka consumption.
Why use eachBatch?
Batch processing allows multiple messages to be processed within the same consumption cycle.
This is especially useful when trying to improve performance or gain better control over offsets, errors, and heartbeats.
In our case, eachBatch gave us more flexibility than message-by-message processing.
It became possible to:
- iterate over messages in the batch
- deserialize keys and values
- build a Kafka context
- call the corresponding NestJS handler
- handle cases where the handler returns a promise or an observable
This approach combines performance with compatibility across the NestJS ecosystem.
Points of attention
Building a custom Kafka library gives a lot of control, but it also comes with more responsibility.
In particular, you need to properly manage:
- connection to the Kafka cluster
- consumer configuration
- message deserialization
- errors
- heartbeats
- graceful application shutdown
- missing or incorrectly configured handlers
- asynchronous handler returns
This type of approach makes sense when the requirements go beyond what the native integration provides.
For simple use cases, the native NestJS Kafka transport can still be enough.
What I would change today
The core idea of this library still makes sense to me.
I would still want to keep the NestJS developer experience while taking back control over Kafka consumption.
But I would change the underlying Kafka client.
At the time, KafkaJS was the best pragmatic choice for our context.
Today, I would build the same kind of abstraction on top of @confluentinc/kafka-javascript.
The reason is simple: for production systems, I prefer relying on an officially supported client, backed by Confluent, based on librdkafka, and designed to make migrations from KafkaJS or node-rdkafka easier.
The abstraction remains valuable.
The foundation would be different.
Conclusion
The native Kafka integration in NestJS is useful when you want to get started quickly.
But when requirements become more advanced, especially around performance, batch processing, and fine-grained consumer configuration, building a custom library can be a good solution.
At the time this work was done, KafkaJS was a practical choice for building that abstraction in a Node.js and NestJS ecosystem.
Today, I would recommend using the official Confluent JavaScript client as the foundation for this kind of library.
The core idea remains the same: keep the NestJS developer experience while taking back control over Kafka consumption.
In our case, this approach allowed us to keep the benefits of NestJS:
- modules
- decorators
- dependency injection
- application lifecycle
while building a Kafka integration that better matched our production constraints.